Using Google Drive to have students collaborate? Check out these great tips from The Techie Teacher website!
Monday, December 5, 2016
Wednesday, September 21, 2016
How to Notify Parents When a Page on Your Google Site is Updated
"I don't feel ready to have a classroom blog right now, but it would be nice if parents were notified when I update my Google Site."
If this is you, there are a few changes you can make to your Google Site so it will notify parents of changes on your homepage.
Here's how:
Open your Google Site for editing. Be sure you are on the homepage, or whichever page you want parents to receive updates for. Highlight and copy any information from that page that you want to keep - this will become part of your first update.
Click the gear.
Click "Page Settings".
You will be changing the page type. Near the bottom, click on the word "Change".
Click the drop down menu that says "Web Page".
Choose "Announcements".
Click "Change".
Once you are back to your page, click the "Edit" button.
Highlight and delete all the content that is currently on the page. Earlier you should have copied what you wanted to save - otherwise do this now!
Click "Save".
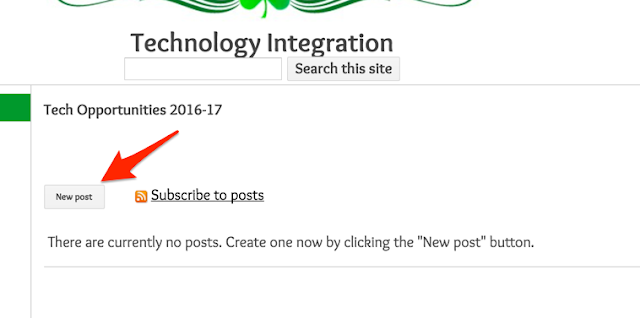
To add the content you copied, click "New Post". This is how you will update this page of your site from now on. You will not need to delete old posts, because the most recent post will always be listed first.

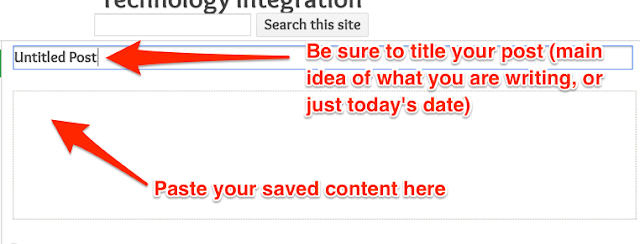
Add a title, then paste your saved content into the new post.

Click "Save".

Each time you want to update the page, you will click "New Post". You do not need to delete the older posts, as they will simply move down the page - leaving the most recent updates at the top.
Your page is now ready for subscribers. How can they subscribe to see when you have updated? Follow Nicole's instructions here to put a "Subscribe to Email Updates" link on your page. (The "Subscribe to Posts" link that is already there . . . that's not the same. It does not provide email updates.)
After adding this, be sure to tell your parents and students to go to the web page and subscribe to updates.
Please contact Beth if you need help getting this set up!
After adding this, be sure to tell your parents and students to go to the web page and subscribe to updates.
Please contact Beth if you need help getting this set up!
Monday, September 19, 2016
Try Kidblog This Year!
Did you know that six teachers at our school used Kidblog last year?
Watch this 1.5 minute video to see what others in our district have done, what Kidblog could add to your classroom, and what support I can give you in implementing this.
Tuesday, September 13, 2016
How to Add Bicyclist Luke Kocher's Blog to Your Google Site
Maple Lake Elementary was fortunate to have guest speakers Mary Lou Nygaard and Luke Kocher at our first Irish Pride Celebration last Friday. Luke helped students to understand the word "stamina". He was a great person to speak about it since he recently completed the Trans American Bike Race across the continental US. That takes a lot of endurance and stamina to keep going!
Here is how you can add information about this to your Google Site for your students to explore.
Go to the page on your Google Site where you want to post about Luke. Click the edit button.
Put your cursor in the place where you want Luke's information to appear.
Type a short message explaining who Luke is and why he came to our school. Then copy and paste Luke's blog address onto the end of your message. https://cyclingalifelongjourney.wordpress.com/
You can now click save and it will be published on your site.
If you would like to add pictures as well, you can grab them here. Download them to your computer and save them to the desktop (or somewhere else where you can find them).
To add the pictures to your Google Site, follow the same first two steps (click the edit button and put your cursor where you want the picture).
Next, click "Insert" in the upper left corner of the screen.
Choose "Image"
Click "Upload Images".
Find the image on your computer (wherever you saved it) and select it. Click "Open".
Select your picture again - it will have a blue outline. Click "OK".
Click on the picture and use the editing buttons to center the picture and make it smaller. Size small or medium are usually appropriate.
To add a caption, put your cursor under the picture and type.
Click save.
Now the picture is on your web site! Make sure to tell your students and parents to look on the site for your new added content.
Friday, August 19, 2016
Prepare for the New School Year by Adding District/Building Events to Your Calendar - With Just a Few Clicks!
It's almost time for Workshops, and many of us have been in our respective buildings getting ready. Is your calendar up to date with all events for the new school year?
All District, Elementary, and High School events can be added to your Google Calendar by following these instructions.
If you have never used Google Calendar before, this is a great way to start!
Monday, March 7, 2016
K12 Global Art Connection - for Art or Classroom Teachers
Image from creativitysymposium.pressible.org
Creativity is one of the four pillars of 21st Century Learning. Engage your students in an art project and share with other classrooms around the world!
The AwesomeSquiggles Project is simple. All students receive the same 4 "squiggles" and create whatever they want with it.
Image from http://awesomesquiggles.weebly.com/
Any materials, physical or digital, can be used. Photos of student art are shared online using the hashtag #awesomesquiggles, and students are able to view what was created around the world.
If desired, classes can additionally choose to be paired with one other class somewhere else in the world, to specifically communicate about the project, to share culturally, and to connect at least once via videoconferencing in April.
Visit the official website for this project to sign up by March 25.
Image from enableeducation.com
Friday, March 4, 2016
Interactive US History for Upper Elementary - High School
Image from www.mission-us.org
Attention Social Studies Teachers
Grades 3-12
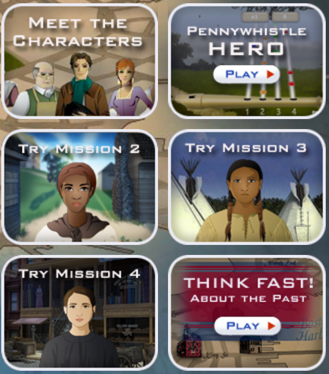
Mission US is an interactive online game that could be thought of as an online "choose your own adventure" which places the student in a time period of Early American History. The student makes choices and watches how they impact what happens to the character.
Image from www.mission-us.org
My own children (2nd and 4th grade) became hooked on this learning game - wanting to play for hours and exchanging information with one another on how to be successful. This inspired great dinner conversation about why certain decisions were helpful to the character in the historical context, and why others weren't.
Your students will love learning through gaming and your curriculum will take on new life.
Image from www.mission-us.org
As the Mission US site cautions, history is messy and difficult. Some topics may only be appropriate for older children, so be sure to preview the game before exploring it with students.
Additionally, students do need to create a username and password. This is not connected to any email address, so the student simply needs to remember their unique login info in order to "pick up where they left off" when playing again. If you want to try this with your students and would like assistance setting up usernames and passwords in advance, contact Beth here.
Tuesday, January 26, 2016
Video Resources - PBS

PBS Learning Media is a resource for short videos on any subject and for all grade levels.
Here are a few of my favorites:
Check to see whether there is a short video to grab your students' interest about the topic you are teaching!
Click here to visit the site.
Friday, January 22, 2016
Videos from ClassDojo about Growth Mindset
Do your students struggle with believing they are "not smart at math" or "just not a writer"?
Teach your students to have a Growth Mindset ("I can work hard to get smarter") rather than a fixed mindset ("I am not smart").
Help them understand that their brain can become smarter with hard work and practice - use this video produced by ClassDojo. This is the first of five videos. The rest are coming out soon!
Tuesday, January 19, 2016
How to Create and Publish a Slideshow of Pictures on your Google Site
Would you like to include photos on your Google Site? Here is an easy way to publish groups of photos as a slideshow. See this example of 6th Grade's Wolf Ridge Google Site. Always be sure to only publish photos of students who are not on the "No Facebook" list, and do not publish full names with the photos.
Begin by making sure the photos are somewhere on your computer.
Load them from your camera or phone, or email them to yourself and download them from your email onto your computer. Place them into a folder on the desktop where you will easily be able to find them.
Upload the photos you want to use, into Google Photos. After you do this, the photos are stored (privately) online, so that you can work on this slideshow from anywhere - even from home. I recommend placing your photos into Google Photos as you take them, so they are ready whenever you want to start creating a video. Here's how.
From your Google email screen, click on the "waffle" in the upper right corner.
Scroll down to click the "Photos" icon, which looks like a pinwheel.
If this is your first time opening Google Photos, you will see a welcome screen like this. Click on the arrow to read the info.
You can then add your photos by dragging them from the folder on your desktop to the Google Photos screen OR by clicking the "upload photos" button, which looks like a cloud.
OR
If you click the cloud to add photos, choose "Desktop", choose the folder you created, and select the photos you want. Then click "Open".
Once your pictures have been uploaded to Google Photos, group the photos for the slideshow into an album. Here's how.
Click the "check mark" in the corner of each picture you wish to be included in the slideshow. It will turn blue when selected.
When all photos have been selected, click the "+" in the upper right corner.
Choose "Album".
Choose "New Album".
Change the word "Untitled" to the title you want for your album.
Now your pictures are ready to be added to a slideshow. Click the arrow in the upper left corner to get back to the main page of Photos.
From the main page of Photos (or your Google email, or any Google app!), click the waffle in the upper right corner.
Scroll down to choose "YouTube".
If given a choice, be sure to use your school account to sign in to YouTube.
Once YouTube opens, click the three lines in the upper left corner.
Choose "My Channel".
Choose "Video Manager".
Choose "Create" from the menu on the left.
You will arrive on a screen for choosing music. This can be done later, so for now click on "Video Editor" from the menu on the left.
Before we start creating, I want to tell you to NEVER, NEVER, NEVER click this button while you are still making your slideshow:
It looks like an innocent "back" button - but your saved progress will disappear if you use it. So don't!
First, create a title for your slideshow and type it in where it says "My Edited Video".
Click on the "Photo" icon to choose photos.
Click "Add Photos to Project".
Choose the album you created earlier within Google Photos.
Click the "+" symbol in the upper right corner of each photo you want to add to the slide show. I have not figured out a way to do them all at once - please let me know if there is a way and I will update this post!
Some people like a title to appear at the beginning of the slideshow. To insert a title screen, click the "a" icon.
Drag one of the types of titles to the place where you want it in the video.
Immediately after you drag it there, you will be allowed to edit what it says. Click the gray "x" once you have typed what you want it to say.
If you would like to add music, click on the "Music Note" icon.
Once you have chosen a song, click the "+" symbol on the far right to add it to your slideshow.
I also like to click the "Transitions" icon to add a fade to the end of the video so it doesn't seem to end so abruptly.
Choose your transition and drag it to the end of your video.
Click "Create Video" in the upper right corner.
Your video will need to process for a while. (Hint: if it's taking forever, try refreshing the page.) When it's done, you can click "share" underneath the video, copy the web address, and add it to your Google Site by following these instructions. Come see how my latest video looks on my Google Site!
Subscribe to:
Comments (Atom)


