Wednesday, September 21, 2016

How to Notify Parents When a Page on Your Google Site is Updated


"I don't feel ready to have a classroom blog right now, but it would be nice if parents were notified when I update my Google Site."

If this is you, there are a few changes you can make to your Google Site so it will notify parents of changes on your homepage.

Here's how:
Open your Google Site for editing. Be sure you are on the homepage, or whichever page you want parents to receive updates for.  Highlight and copy any information from that page that you want to keep - this will become part of your first update.


Click the gear.


Click "Page Settings".


You will be changing the page type.  Near the bottom, click on the word "Change".


Click the drop down menu that says "Web Page".


Choose "Announcements".


Click "Change".


Once you are back to your page, click the "Edit" button.


Highlight and delete all the content that is currently on the page. Earlier you should have copied what you wanted to save - otherwise do this now!  


Click "Save".


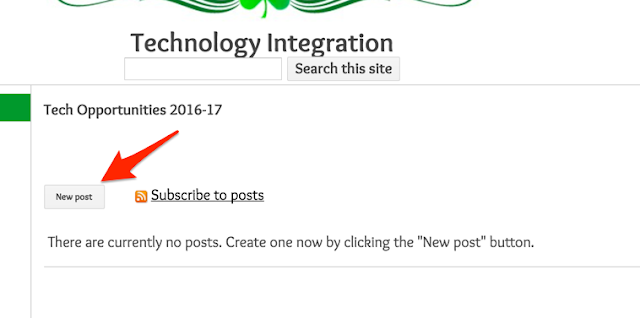
To add the content you copied, click "New Post".  This is how you will update this page of your site from now on.  You will not need to delete old posts, because the most recent post will always be listed first.

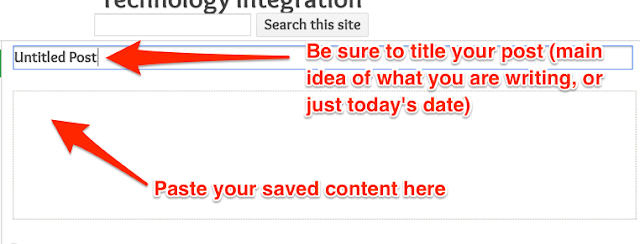
Add a title, then paste your saved content into the new post.


Click "Save".


Each time you want to update the page, you will click "New Post".  You do not need to delete the older posts, as they will simply move down the page - leaving the most recent updates at the top.

Your page is now ready for subscribers.  How can they subscribe to see when you have updated?  Follow Nicole's instructions here to put a "Subscribe to Email Updates" link on your page.  (The "Subscribe to Posts" link that is already there . . . that's not the same.  It does not provide email updates.)

After adding this, be sure to tell your parents and students to go to the web page and subscribe to updates.  

Please contact Beth if you need help getting this set up!


Monday, September 19, 2016

Try Kidblog This Year!


Did you know that six teachers at our school used Kidblog last year?

Watch this 1.5 minute video to see what others in our district have done, what Kidblog could add to your classroom, and what support I can give you in implementing this.


Tuesday, September 13, 2016

How to Add Bicyclist Luke Kocher's Blog to Your Google Site


Maple Lake Elementary was fortunate to have guest speakers Mary Lou Nygaard and Luke Kocher at our first Irish Pride Celebration last Friday.  Luke helped students to understand the word "stamina".  He was a great person to speak about it since he recently completed the Trans American Bike Race across the continental US. That takes a lot of endurance and stamina to keep going! 


Here is how you can add information about this to your Google Site for your students to explore.

Go to the page on your Google Site where you want to post about Luke.  Click the edit button.


Put your cursor in the place where you want Luke's information to appear.


Type a short message explaining who Luke is and why he came to our school.  Then copy and paste Luke's blog address onto the end of your message.  https://cyclingalifelongjourney.wordpress.com/


You can now click save and it will be published on your site.


If you would like to add pictures as well, you can grab them here.  Download them to your computer and save them to the desktop (or somewhere else where you can find them).

To add the pictures to your Google Site, follow the same first two steps (click the edit button and put your cursor where you want the picture).  

Next, click "Insert" in the upper left corner of the screen.


Choose "Image"


Click "Upload Images".


Find the image on your computer (wherever you saved it) and select it.  Click "Open".


Select your picture again - it will have a blue outline.  Click "OK".


Click on the picture and use the editing buttons to center the picture and make it smaller.  Size small or medium are usually appropriate.

To add a caption, put your cursor under the picture and type.


Click save.


Now the picture is on your web site!  Make sure to tell your students and parents to look on the site for your new added content.